How to Hang Pre-pasted Sure Strip WallpaperUpdated 3 months ago
Sure Strip wallpaper is manufactured with a unique substrate and special adhesive formulated to allow effortless application, and removal when it's time to redecorate.
INSPECTION: Even though your wallpaper has been throughly inspected, it's important to take a few minutes before hanging to closely examine your wallpaper for proper color, design, and quantity. Make sure all of your rolls are of the same run (or lot) number, and there are no print imperfections. Warranty claims will be limited after cutting and hanging three strips.
SURFACE PREPARATION: To get the best results out of your wallpaper it is very important to properly prepare the hanging surface. For safety, turn off the electrical power to the room and remove all switch plates and wall covers. Old wallpaper should be removed. Walls should be clean, dry and smooth. Repair and smooth any holes or rough areas that may affect the finish of your wallpaper. The surface to be covered should have two coats of paint, or premixed universal wallpaper primer.
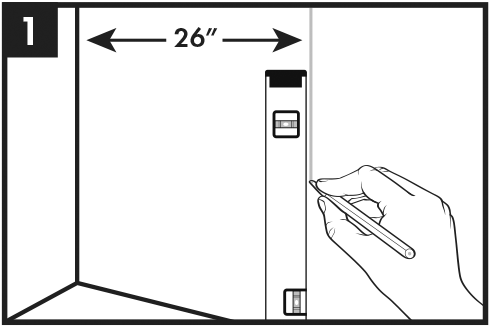
1. Start your installation in the least conspicuous corner of the room such as behind a door or large piece of furniture. Measuring out from the corner of your starting wall, make a pencil mark 1" less than the width of your wallpaper so that the first strip will wrap 1" into the corner. (For Example: If paper is 27" wide, make your mark at 26") Place a straight edge level or plumb line on this mark and using a pencil strike a vertical line on the wall. Cut your first strip 4" longer than the height of the surface you intend to cover. This gives you an extra 2" at the top and at the bottom for trimming, once the wallcovering is placed on the wall.

2. Lay your cut strip pattern side down, on the floor or a table, using a drop-cloth or towel to protect against any overspray of water. Using a Wallpaper Hand Sprayer, activate the paste by spraying a fine mist of clean water to the pasted surface. Spray in long strokes the length of the paper making sure to thoroughly wet the entire back of the strip, paying close attention to the edges.
Applying additional paste to Sure Strip pre-pasted wallpapers will make future removal more difficult and voids our guarantee.

3. Fold each end of the moistened strip toward the middle, pasted sides together, aligning the edges carefully so they do not dry out. Avoid creasing the paper. Roll the strip up as you would a loose newspaper, set it aside for 2-3 minutes allowing the paste to activate and the paper to relax. This is known as booking.
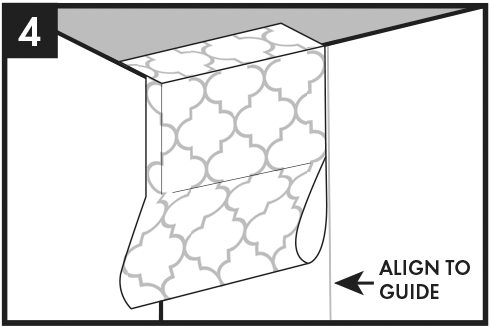
4. After booking for three minutes, carry the strip to the wall and unfold the top half of the strip. Align the edge of your first strip with your level vertical line from Step #1. Reposition or slide the strip as needed, to line up with your level line. Unfold the bottom half of the strip and lay the paper onto the wall and into and around the corner. Remember, you should have an overlap of wallpaper at the ceiling and baseboard that will be trimmed off later.
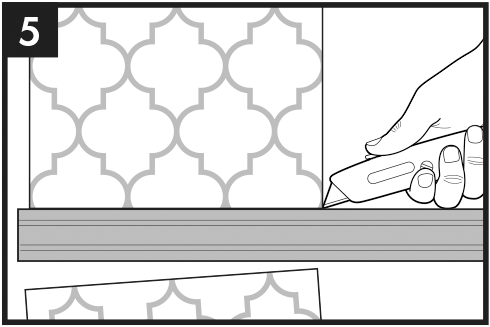
5. Using a smoothing brush or sponge, gently smooth the entire strip to the wall. Work diagonally from the top down and center outward, removing all air bubbles, wrinkles and excess paste. Using a straight edge tool and a sharp razor knife, trim the excess wallpaper at the baseboard, ceiling line and around windows, doors, etc. For clean cut lines, replace your knife blades often. Thoroughly wipe down the surface of the strip with clean water and a sponge. Paste residue left to dry on the print surface may cause damage to the print.
CAUTION: For any Raised Print Patterns: Because of the special inks used in creating these fine papers, some color may release when the inks are wet, thus it is important to gently and evenly wipe the front of each sheet. Aggressive wiping can damage the raised inks.

6. Using pattern match at baseboard and ceiling as a reference, determine the length of your next strip. Allow an extra 2” at the top and bottom for trimming. Then repeat Steps # 2 and #3.

7. Slide the next strip into position with its edge butted against the edge of the preceding strip. Be sure to match design of the adjacent strip at eye level. Do not overlap seams. Gently smooth seams with a smoother. Light pressure should be used to prevent removal of adhesive from the edges. Then repeat Steps #5 and #6.
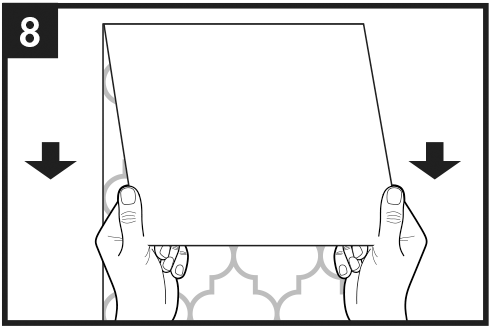
REMOVAL: Place a drop-cloth or towel along the base of the wall to protect your floor from any water runoff. Using your Wallpaper Hand Sprayer, lightly spray the entire surface of the paper with a fine mist of clean water, moving from the bottom to the top of the strip and back down or moisten the surface of the paper with a wet sponge. Wait 1-2 minutes. Loosen both top corners and pull the entire strip, slowly but firmly downward, not outward, from ceiling to floor.
CLEANING TIPS: To remove loose dirt and dust, the wallpaper can be cleaned using the soft brush attachment of a vacuum. To remove basic stains, we recommend using a mild soap and warm water solution and lightly wiping with a clean white cloth or sponge.